Handwriting part 2
In this guide...
Key terms:
Subscription required!
To view the complete study guide, you will need a valid subscription. Why not subscribe now?
Already have a subscription? Make sure you login first!
Introduction
Building on the advice in Handwriting part 1, here are some more helpful tips to improve your musical handwriting.
Clarity
The most important thing to remember, when you are writing music out by hand, is to make sure that the music is clear. While it is important that your writing is neat and tidy, clarity is much more important than neatness.
It is possible for music to be neat, but very hard to read. Furthermore, if you spend a lot of time making your notation look perfect on the page, this is not very efficient - you need to develop the ability to write quickly but also clearly.
If your musical handwriting can easily and accurately be read by someone else, then it is neat enough!
In this guide we will focus on a few things that can improve the clarity of your handwriting:
Writing rhythms
When writing rhythms down, you should try to keep the spacing of each rhythmic value in proportion with other values. For example, a quaver is half the duration of a crotchet, so you should try to ensure that each quaver takes up half the space of a crotchet, and so on.
This can be tricky to do consistently, but so long as you at least ensure that shorter rhythmic durations take up less space than longer durations, this will improve the legibility of your handwriting.
You should also leave space for accidentals, if needed; this means that every note will need this space even if only one or two notes actually have accidentals. If you don't keep the space consistent, then any notes with accidentals will (at first glance) appear to be of longer durations!
Here is an example showing poor spacing, and the same example with good spacing:
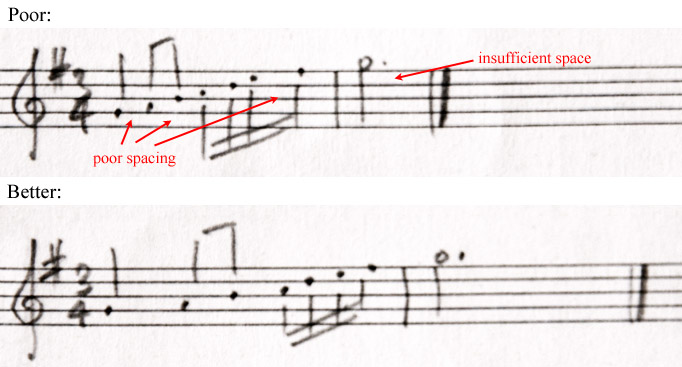 Poor and better spacing of rhythms
Looking at the final note in the example - notice how, even though there is just one note in the bar, the bar is sufficient size to reflect the duration of the note.
Tails
The tails of notes should all be a consistent length, and should hang down or point up correctly, depending on whether the note is above or below the middle line of the stave.
For a run of notes that are beamed together, the tails should point in the correct direction for the first note, even if normally the following notes would have tails pointing in the opposite direction.
Tails should point down for notes that are on or above the middle line of the stave, and tails should point up for notes below the middle line.
The length of your tails should be a little shorter than the height of the stave. If you write a note on the top or bottom line, don't allow the tail to extend across the whole stave, to avoid any confusion between the tail and a barline.
Look at the following handwriting, in particular at the length of the tails of the notes, and the direction of the tails. The first example is poor, and the second example is better.
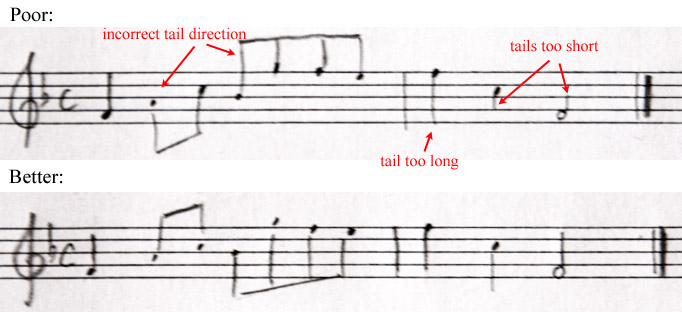 Poor and better tail-length and direction
There is one exception to this rule, for vocal music on a single line.
In order to avoid the tail of a note on the middle line clashing with any lyrics, in vocal music only it is normal for the tails of notes on the middle line to point up instead of down.
The example below illustrates this:
 The tail of a note on the middle line normally hangs down, but in vocal music it points ups
Rests
Rests should be positioned vertically in the stave with care.
Crotchet and quaver rests, and all smaller rests, should be symmetrically positioned around the middle line of the stave, as shown here (once again, poor and better versions are shown):
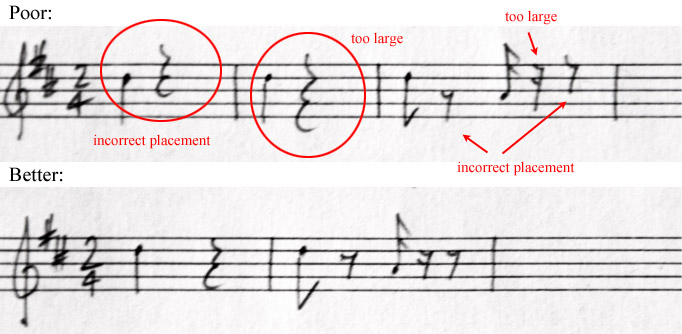 Poor and better crotchet and quaver rest positions
Minim and semibreve rests must always be positioned either sitting on the middle line (minim rests) or hanging below the second line from the top (semibreve rests).
All rests must be positioned horizontally in the same place that a note of equivalent duration would be placed - "left aligned", in word processor terms.
Whole bar rests
There is an exception to this rule about horizontal positioning, and that is for whole bar rests. These are normally semibreve rests - even if the bar is of a smaller duration - and they are positioned in the centre of the bar. There must be nothing else in the bar apart from the "whole bar" rest!
Here are some poor and better examples of minim and semibreve rest positions, both of the normal type and filling a whole bar:
 Poor and better minim and semibreve rest positions
A notable exception
Semibreve rests are always used for a whole-bar rest, with one exception, and that's in the 4/2 time signature.
In 4/2, we used a breve rest instead of a semibreve. The position is still in the centre of the bar, but the rest itself looks slightly different - it's a bit like a minim and semibreve rest combined, and spans the whole of the second space down.
Here's a written and printed example side by side:
 Written and printed breve rests
Dots and ties
When writing dotted rhythms, ensure that the dots are not too big (which may be confused with note-heads or grace notes), and not too small (they must be visible!). They must also not be too far from the note to which they are attached.
Ties and slurs must have a clear beginning and end: i.e., it must be obvious to which notes the beginning and end are "attached". The arc of a tie or slur should bend in the opposite direction of the tail direction of the first note, and the tie/slur should begin on the opposite side of the note-head to the tail.
Here are some poor and better examples of dotted notes, ties, and slurs:
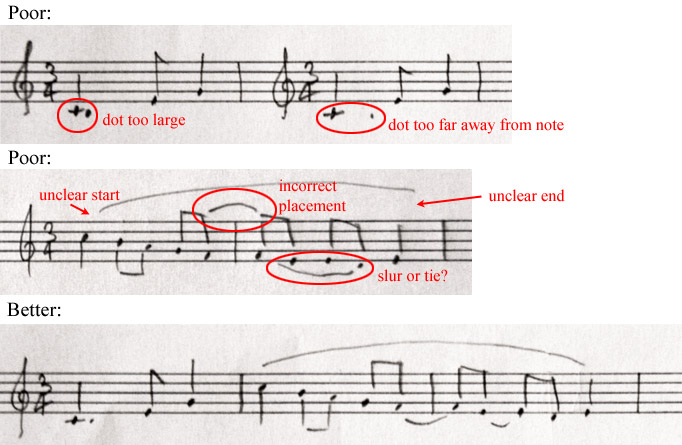 Poor and better dots and ties / slurs
Notes together
When writing chords or dyads (i.e. two notes sounding together), the individual notes must be clearly identifiable, and carefully stacked together vertically (not in a wobbly stack!), and must not overlap.
When two notes are only a 2nd apart, you cannot stack them directly on top of each other without overlapping, and so they should be positioned either side of the tail. The lower note always goes on the left.
Here again are some poor and better examples:
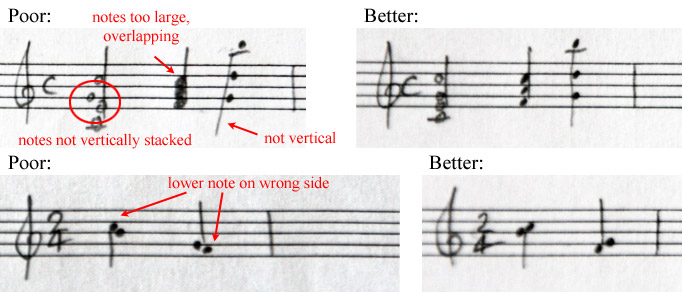 Poor and better chords and dyads
Dynamics
Finally, when you write dynamics, ensure that they are clearly the note to which they apply. When writing hairpins, make sure that (like slurs) they clearly begin and ends on a specific note.
Here are some examples:
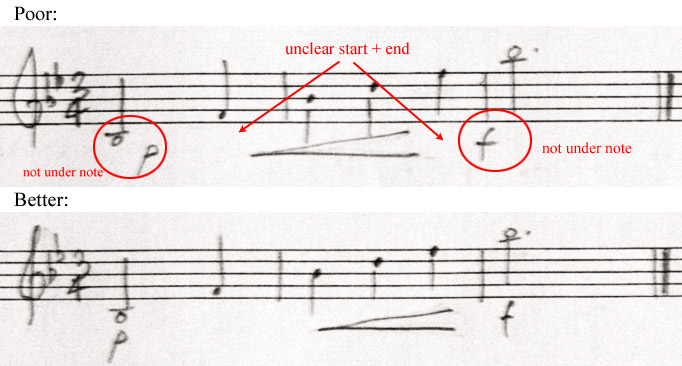 Poor and better dynamics
Read more...
With a subscription to Clements Theory you'll be able to read this and dozens of other study guides, along with thousands of practice questions and more! Why not subscribe now?