Handwriting part 1
In this guide...
Key terms:
Subscription required!
To view the complete study guide, you will need a valid subscription. Why not subscribe now?
Already have a subscription? Make sure you login first!
Introduction
When writing music, it's very important to have neat handwriting. This isn't just so that you can write out nice-looking scores, but it's essential in communicating precisely what you intend to players - or, indeed, to examiners who will be looking for the slightest flaw.
Equipment
Before doing anything else, make sure you have the write equipment for writing music. Nothing very sophisticated is needed - just a pencil and an eraser! And it might seem obvious, but make sure that your eraser is capable of erasing your pencil.
The best pencil to use is a slightly softer type, such as B rather than HB. You will find that a softer pencil will draw things like note-heads much more quickly, and softer lead is easier to rub out, and makes less of an indentation on the page.
Finally, the other essential piece of equipment is a pencil sharpener. Always make sure your pencil is sharp! A blunt pencil cannot draw accurately, and you really must be accurate and precise above everything else when writing music.
 Essential equipment!
Do I need a ruler?
A ruler is not really necessary - all the straight lines you'll need to draw (for example, barlines) are short enough that you can do them free-hand. Using a ruler will only slow you down.
Staves
In the old days, to make manuscript paper, composers and copyists* had to draw their own staves by hand. You can imagine how long that would take! Igor Stravinsky even created his own time-saving machine to draw five lines at once (he called it the "Stravigor"!).
Fortunately, in the modern day we have manuscript paper readily available at school and in music shops. The best way to get manuscript paper, however, is simply to photocopy one piece, or to print blank manscript from a computer.
Here is a link to a PDF of some blank manuscript paper that you can save and print off as many times as you like:
*Often employed by a publisher, a copyist is someone copies out a composer's manuscript into a neat score, and then produces a set of parts for the musicians to play (if it's a piece for more than one instrument, that is). Nowdays, copyists use computer programs such as Sibelius or Finale.
Notes
Your noteheads should all be a consistent size and shape. The ideal shape is slightly oval or egg-shaped, slanting up from left to right. You'll be able to see this shape in printed music but it's difficult to get the same shape with a pencil. Instead just ensure that your notehead shapes are all the same, and that the black notes (crotchets, quavers, etc.) are the same size as your white notes (minims). Semibreves can be slightly wider.
If you're writing a note in a space, make sure that the whole notehead is inside the space, touching (but not crossing) the lines above and below.
If you're writing a note on a line, make sure that the notehead lies evenly above and below the line (i.e. that the line goes right through the middle). Off-centre notes can be very confusing for the player.
When writing notes below the stave (using ledger lines), make sure the distance between the ledger line(s) and the stave is the same as between the lines of the stave itself. After all, ledger lines are just mini-extensions of the stave!
Sharps and flats
As with noteheads, it's difficult to draw sharps and flats that are exactly like the printed versions, so instead try to make sure that all your sharps and flats look the same.
And again, just as with noteheads, make sure that the sharp or flat sign is clearly occupying the same space as the note it's associated with, and if you're at the beginning of a line, make sure any sharp or flat sign doesn't look like part of a key signature - don't start too close to the clef.
Clefs
The bass clef is definitely easier to draw than the treble clef; try to make sure it only takes up the space of the stave itself and doesn't go above or below. Most importantly, make sure that the two dots are either side of the "F" line.
The treble clef can take some practice. Start by drawing a vertical line extending just above and below the stave, and use this as the basis for your clef, as shown in the example below. Remember to start your "curl" on the "G" line!
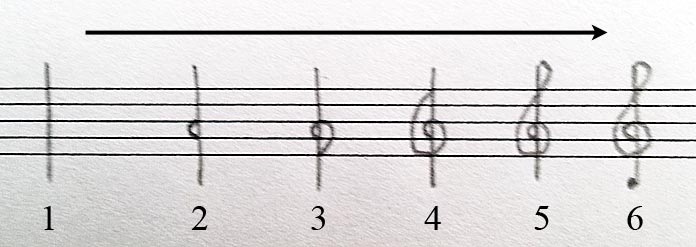 Steps for drawing a treble clef
It's worth filling a page just with treble and bass clefs to get them perfect. As with all other aspects of musical notation, your handwriting won't be like printed music, but make sure everything you write looks consistent!
An example
Finally, here's an example of Baa Baa Black Sheep written out quickly, by me! As you can see, it doesn't look like printed music, and the lines aren't very straight, but it is clear and easy to read. Importantly, it took only a few seconds to write out. Imagine how difficult things would be if you couldn't write words out quickly - your aim should be to get as quick writing music!
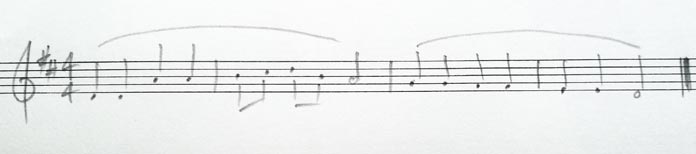 Baa Baa Black Sheep written out quickly
Practice
Unlike the other study guides, there are no practice questions this time. Instead, get some practice in! Here are some suggestions:
- Fill a page with treble clefs, following the 6-step process above until you can do it in one fluent action.
- Copy out some of the music you're learning on your instrument...
- ...then try and play from what you've written out. Is it clear? What could be improved?
- Even better, work with a friend, and try to play what the other person has copied out, and watch them try to play what you've copied out. What can they improve?
Read more...
With a subscription to Clements Theory you'll be able to read this and dozens of other study guides, along with thousands of practice questions and more! Why not subscribe now?